
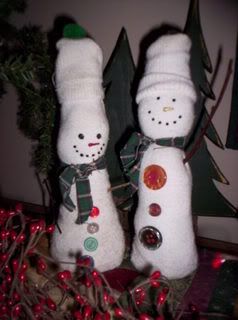
My boys & I made these fun winter snowman from their old tube socks. They are so sweet and you can keep them out from November thru February ... or all year long if you're a snowman lover like me!
All you need is:
1 child's tube sock - new or used
1/2 cup dried beans, peas or rice
a little bunch of fiberfill stuffing
1 piece of string - 4 inches or so
fabric paints ~ black & orange or whatever you have
1 pom pom
3 (more of less) assorted buttons
2 twigs
1 8 inch strip of homespun or other fabric for scarf
Glue (elmers or a glue gun)
Start with your tube sock. If it is old & worn ~ that's okay. Just add a stitch or two to close any holes and you're ready to go. Remember this is a primitive snowman and he's supposed to look old & worn.
First, open sock and pour in your beans or rice to weigh him down and help him to stand nicely. Stuff the rest of the sock with fiberfill up to the bottom of the sock's cuff line. Use your twine (or rubber band or twisty tie) to tie the sock closed right at this cuff line. Now turn down the cuff of the sock and flip the end back up again to form his knit cap. Your snowman form is all done and we're ready for the fun part ~ decorating this little fellow!
Take your strip of homespun and tie it around the snowman about an 1 1/2" below the hat line ~ more if you want a bigger head ~ less if you want a smaller one. This will form his head. Using a little glue, add the pom pom to the top of his hat.
Using your glue, place 2-3 buttons down his body. If you use elmers glue, you'll need to let it dry before proceeding. My boys & I just used our fabric paint ... we put a little dot and stuck the button right on. It worked!
Now it's time for his face. Using our fabric paint, we made little black dots for eyes and made a dotted mouth as well. Don't forget his nose! You may want to let his face dry before adding his arms so there is no worry about smudging.
Finally, with a sharp point (little ones will need your help) make a little puncture on each side the body for Mr. Snowman's arms. Squeeze a little glue in the hole and work the twigs right in place. Then let 'em dry.
Your snowman is all done! Get creative. Add some sparkle glitter. Paint his hat. Have fun!
You'll definately want to take a marker and add your child's name & the year to the bottom of the darling fellow. He is sure to become a family heirloom!
Now go have some fun ... and send me some photos of your finished projects!


3 comments:
Lea...I just LOVE the snowmen!!!! Cor, my sister, told me about them and sent me to your blog...one look convinced me I would have to try to make one...and, with a HUGE tube sock, I now have the cutest snowman sitting on my counter!!! Now I want to get little socks to make my snowman some snowbabies!
Thanks so much for sharing directions on how to make this...
Keep writing...your blogs make us all want to get more back to nature!
Jurilei
Adorable!
Happy Holidays!
Sandra Evertson
So CUTE!!!! I think i might just have my boys make up some of these for Christmas gifts.... wouldn't grammies and grampies love that?!?!?!
Thank you sweet sister!
God bless you
Post a Comment